Welcome to my blog, hope you enjoy reading
RSS

Monday, 9 July 2012

SWT Browser requires a compatible xulrunner version installed


error:
GWT Designer uses the SWT Browser widget to render the GWT UI. SWT
Browser requires a compatible xulrunner version installed: it should
be 1.9.1.x or 1.9.2.x version and meet the current environment
architecture. See http://www.eclipse.org/swt/faq.php#whatisbrowser and
related topics for more information. 

solution:

1 - Download eclipse from eclipse.org. 
http://www.eclipse.org/downloads/packages/eclipse-classic-372/indigosr2
(DO NOT USE UBUNTU REPOSITORY.)

Install GWT according to the guide:
https://developers.google.com/eclipse/docs/download

2 - After installation, start Eclipse and disable the option
 "Use webkit rendering window for GWT UI if available", at Window, Preferences, Window Builder,
 GWT

3 - Install the following two libraries in the following order, which will replace the webkit: 
sudo dpkg-i packagename.deb

download and install:
https://docs.google.com/file/d/0B9KWSpNWygKAYW1yeDhBa2xaRlU/edit# 
(filename: libhunspell-1.2-0_1.2.11-1ubuntu1_i386.deb ) 
 
download and install:
http://depositfiles.com/files/eusg1y75c 
(filename:  xulrunner-1.9.2-ubuntu-i386.deb ) 
(to install double click on the file)

 Or look for xulrunner!

4 - Restart eclipse. GWT Designer is already running again.


advanced-suggest-select-box


Share

Thursday, 5 July 2012

GWT plugins adding in eclipse

GWT plugins adding in eclipse

1.download the eclipse from eclipse link

2.open help--->install new softwares..

ADT- https://dl-ssl.google.com/android/eclipse/(required)

indigo update- http://download.eclipse.org/releases/indigo(required)

gwt- http://dl.google.com/eclipse/plugin/3.7(required)

GWT Designer Update Site - http://dl.google.com/eclipse/inst/d2gwt/latest/3.7 (required)

svn- http://subclipse.tigris.org/update(for svn)
Share

Wednesday, 4 July 2012

Running multiple tomcat servers


Running multiple tomcat servers


Download tomcat, and unpack it twice, into two separate directories. Edit the conf/server.xml file in one of the copies in the following way: Change the port on the root Server element to a different number (e.g. 8006) Change the port attributes on the Connector elements to a different number (e.g. 8010 instead of 8009, 8081 instead of 8080 and 8444 instead of 8443) You should now be able to run the bin/startup.sh scripts in both installations to get two running tomcats. Connect using port 8080 and install the basic application services, and then connect using port 8081 to install the service provider management services. Source link. Some other useful links are given linkslinks.
Share

Tuesday, 3 July 2012

Configuring Tomcat 6 with eclipse in ubuntu


Configuring Tomcat 6 with eclipse in ubuntu

open terminal and type this
sudo apt-get install tomcat6(not required if already installed)

cd /usr/share/tomcat6
sudo ln -s /var/lib/tomcat6/conf conf
sudo ln -s /etc/tomcat6/policy.d/03catalina.policy conf/catalina.policy
sudo ln -s /var/log/tomcat6 log
sudo chmod -R 777 /usr/share/tomcat6/conf
restart servet
then configure the server
Share

Monday, 25 June 2012

How to format a USB or external drive?

Share

Monday, 18 June 2012

creating the hosts in the tomcat server in ubuntu

creating the hosts in the tomcat server in Ubuntu


step1:  In the /var/lib/tomcat6/conf/Catalina path we create folder with hostname 
           example: 'restarant'


step2: In that folder we create the file with name  'ROOT.xml'
           /var/lib/tomcat6/conf/Catalina/restaurant/ROOT.xml


step3: put following code in the ROOT.xml file


           <?xml version='1.0' encoding='utf-8'?>
           <Context displayName="hostname" docBase="/var/lib/tomcat6/webapps/warfilename/"                                                path=""  workDir="work/Catalina/hostname/_">
          </Context>

            example :
           <?xml version='1.0' encoding='utf-8'?>
           <Context displayName="restaurant" docBase="/var/lib/tomcat6/webapps/Restaurant/" path=""
           workDir="work/Catalina/restaurant/_">
          </Context>

step4:  In the /var/lib/tomcat6/conf/server.xml file  host tag(<Host>) data will be re paste in the file after close the host tag(</Host> and change the data in the 
example:

<Host name="hostname"  appBase="webapps/warfilename/"
            unpackWARs="true" autoDeploy="true"
            xmlValidation="false" xmlNamespaceAware="false">

        <!-- SingleSignOn valve, share authentication between web applications
             Documentation at: /docs/config/valve.html -->
        <!--
        <Valve className="org.apache.catalina.authenticator.SingleSignOn" />
        -->

        <!-- Access log processes all example.
             Documentation at: /docs/config/valve.html -->
        <!--
        <Valve className="org.apache.catalina.valves.AccessLogValve" directory="logs"
               prefix="localhost_access_log." suffix=".txt" pattern="common" resolveHosts="false"/>
        -->

      </Host>

step5: in Filesystem/etc/hosts file add the hostname and localhost port like
example:  127.0.0.1 restaurant


step6: restart the server

step7: In browser enter url like
example:  http://restaurant:8080/(hostname:portnumber)
Share

Tuesday, 5 June 2012

database and java


Changing the engine in the all tables of the database progrmetically for mysql


                     Connection connection = null;
   try{
                     //for getting the connecion  
    Class.forName("com.mysql.jdbc.Driver");  
    connection =                                                       DriverManager.getConnection("jdbc:mysql://localhost:3306/hydhouse","root","password");
         try{          
           // Create statement object
           Statement stmt = connection.createStatement();

                            //for getting the tables from that database
           DatabaseMetaData dbm = connection.getMetaData();
 String[] types = {"TABLE"};
 ResultSet rs = dbm.getTables(null,null,"%",types);
 while (rs.next()){
 String table = rs.getString("TABLE_NAME");

//for change the engine in mysql
 String sql="ALTER TABLE "+table+" ENGINE = innodb ";
 int i=stmt.executeUpdate(sql);
 System.out.println(i);
 }
       }
       catch (SQLException s){
        connection.close();
         System.out.println("SQL Exception " + s);
       }


Share

Wednesday, 21 March 2012

GWTMobile working process in eclipse

GWTMobile working steps:


step:1. create the GWT normal Web application using eclipse.

step:2. add the following tags in the .gwt.xml file
            and then add the jar files in the classpath
            gwtmobile-1.1.jar , org.restlet.jar (download gwtmobile-kitchensink.1.1.zip
            from  https://github.com/dennisjzh/GwtMobile/downloads  ),
           gwt-html5-database.jar(download from
           http://code.google.com/p/gwt-mobile- webkit/downloads/detail?name=gwt-html5-database-1.5.1.tar.gz)

                   //for gwtmobile widgets designer

           <inherits name='com.gwtmobile.ui.gwtmobile_ui' /> 
                  //for gwtmobile phonegap events and features
          <inherits name='com.gwtmobile.phonegap.gwtmobile_phonegap' />
                  //for database connection using html5
         <inherits name="com.google.code.gwt.database.Html5Database" />     
         <inherits name='org.restlet.Restlet' />


step.3. Add the Page extended class on entrypoint class
           ex: MainPage is class extends Page(com.gwtmobile.ui.client.page.Page)
     
public void onModuleLoad() {
                MainPage page;
new Timer()
{
@Override
public void run() {
if(page==null)
{
page=new MainPage();
Page.load(page);
}else
this.cancel();

}

}.scheduleRepeating(50);
}

step:4. If you are using uiBinder (xml)  designing
            then right click on client package select new -->UiBinder 
            take classname.
            then change the extended class of Composite to Page in .java file

step:5. Open the .ui.xml file in designing mode and design the page

step:6. In war folder
            paste the bluetooth.js,childbrowser.js,phonegap-1.0.0.js (from gwtmobile-kitchensink.1.1.zip)
            and add the following code in the .html file

          <script type="text/javascript" language="javascript" src="phonegap-1.0.0.js"></script>
<script type="text/javascript" language="javascript" src="bluetooth.js"></script> 
          <script type="text/javascript" language="javascript" src="childbrowser.js"></script>

step:7. For compile the project
            right click on project and select Google-->GWT Compile
           
step:8. Then take the following files from the war
            all files and folder other than the WEB-INT folder

step:9. Use that code as html files in phonegap applications.


prabhu gade,
kumarprabhug@gmail.com
Share

Thursday, 8 March 2012

HTML5 to connect the SQLite example


Problem

You wold like for your HTML5 application to persist user data in a SQL structure.

Solution

You can use the SQLite datastore available to HTML5 browsers.

Detailed explanation

The following example requires an HTML5 browser. It will create a SQLite database and persist data stored in a table structure.
Let's review the code below.
The page contains some form input fields to hold some information about the user. This includes the firstName, lastName, and phone. There are also buttons to perform the functions of reset, update, insert, and drop. There is also a div with the id or results to display the data.
Now, lets review the process.
Within the JavaScript block, there are variables to hold references to the form elements and the results div. Next, the SQL strings are defined which will be used to interact with the database.
The db variable is defined using the openDatabase function. The database is named AddressBook.
Next, the createTable function is called. Within the createTable function the createStatement is executed with no arguments passed in which will create the table Contacts if it doesn't currently exist. The showRecords method is called when the statement executes successfully. If not, the onError method is called if the statement fails.
Within the showRecords function the results.innerHTML is set to empty string. The selectAllStatament is executed with no variables passed in. On success, the result.rows array is set to the dataset class variable. The dataset is then looped over and the results.innerHTML is written with the lastname, firstname and two links for editing and deleting the contacts.
At this point the page is fully loaded, the AddressBook database and the Contacts table have been created. (See figure 1)
When the user fills out the form and clicks the Insert button, the insertRecord function is called. Within this function the insertStatement is called with the firstName.value, lastName.value, and phone.value arguments passed in. On success the loadAndReset function is called which will reset the form and call the showRecords function which will display the new record within the results div. (See figure 2)
When the edit links is clicked, the loadRecord function is called and the form is populated.
When the delete link is clicked, the deleteRecord function is called. Within the deleteFuction the deleteStatement is executed with the id argument passed in. On success, the showRecords function is called which refreshes the results div.
Finally, there is a drop button which when clicked calls the dropTable function. Within the dropTable function the dropStatement is executed with no arguments passed in.  On success, the showRecords function is called which refreshes the results div.

HTML CODE+JAVASCRIPT

  <!DOCTYPE html PUBLIC "-//W3C//DTD XHTML 1.0 Transitional//EN" "http://www.w3.org/TR/xhtml1/DTD/xhtml1-transitional.dtd">
<html xmlns="http://www.w3.org/1999/xhtml">
<head>
<meta http-equiv="Content-Type" content="text/html; charset=UTF-8" />
<title>SQL Storage</title>
 <body>
  <br/><br/>
   <div align="center">
    <input type="hidden" id="id"/>
    First name:<input type="text" id="firstName"/><br/>
    Last name:<input type="text" id="lastName"/><br/>
    Phone: <input type="text" id="phone"/><br/>
    <button onClick="resetForm()">Reset Form</button>
    <button onClick="updateRecord()">Update</button>
    <button onClick="insertRecord()">Insert</button>
       <button onClick="dropTable()">Drop Table</button>
    <div id="results"></div>
   </div>
 </body>

   <script>
var results = document.getElementById('results');
var id = document.getElementById('id');
var firstName = document.getElementById('firstName');
var lastName = document.getElementById('lastName');
var phone = document.getElementById('phone');
 
var createStatement = "CREATE TABLE IF NOT EXISTS Contacts (id INTEGER PRIMARY KEY AUTOINCREMENT, firstName TEXT, lastName TEXT, phone TEXT)";
var selectAllStatement = "SELECT * FROM Contacts";
var insertStatement = "INSERT INTO Contacts (firstName, lastName, phone) VALUES (?, ?, ?)";
var updateStatement = "UPDATE Contacts SET firstName = ?, lastName = ?, phone = ? WHERE id = ?";
var deleteStatement = "DELETE FROM Contacts WHERE id=?";
var dropStatement = "DROP TABLE Contacts";

var db = openDatabase("AddressBook", "1.0", "Address Book", 200000);
var dataset;
createTable();

     function onError(tx, error) {
       alert(error.message);
     }
   
     function showRecords() {
       results.innerHTML = '';
       db.transaction(function(tx) {
         tx.executeSql(selectAllStatement, [], function(tx, result) {
dataset = result.rows;
           for (var i = 0, item = null; i < dataset.length; i++) {
             item = dataset.item(i);
             results.innerHTML +=
                 '<li>' + item['lastName'] + ' , ' + item['firstName'] + ' <a href="#" onclick="loadRecord('+i+')">edit</a>  ' +
   '<a href="#" onclick="deleteRecord('+item['id']+')">delete</a></li>';
}
         });
       });
     }
   
     function createTable() {
       db.transaction(function(tx) {
         tx.executeSql(createStatement, [], showRecords, onError);
       });
     }
   
     function insertRecord() {
       db.transaction(function(tx) {
         tx.executeSql(insertStatement, [firstName.value, lastName.value, phone.value], loadAndReset, onError);
       });
     }
   
function loadRecord(i) {
var item = dataset.item(i);
       firstName.value = item['firstName'];
lastName.value = item['lastName'];
phone.value = item['phone'];
id.value = item['id'];
     }

     function updateRecord() {
       db.transaction(function(tx) {
         tx.executeSql(updateStatement, [firstName.value, lastName.value, phone.value, id.value], loadAndReset, onError);
       });
     }
   
     function deleteRecord(id) {
       db.transaction(function(tx) {
         tx.executeSql(deleteStatement, [id], showRecords, onError);
       });
resetForm();
     }
     
     function dropTable() {
       db.transaction(function(tx) {
         tx.executeSql(dropStatement, [], showRecords, onError);
       });
resetForm();
     }

function loadAndReset(){
resetForm();
showRecords();
}

function resetForm(){
firstName.value = '';
lastName.value = '';
phone.value = '';
id.value = '';
}
   </script>
</html>​

figure1:
figure2:

Share

Tuesday, 21 February 2012

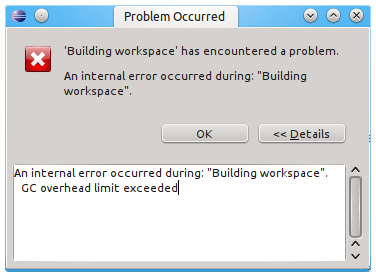
How to fix GC overhead limit exceeded in Eclipse

How to fix GC overhead limit exceeded in Eclipse

Especially true if you're using Eclipse in 64 bit machine, Eclipse will throw GCoverhead limit exceeded when it runs out of memory when performing memory-consuming operations such as building workspace on big projects.
Share